.png)
Contact form for Blogger: Create a Unique Contact Us form easily and for Free on Blogger.
Have you been scratching your head wondering, just how will I create a contact page for my blog?
Not just a contact form, but a beautiful
one as well?

Well, I have had the same question for the past few months.
On my blog, I request readers to leave their suggestions in the comments but
this is not always ideal. You see, most of the people who land on your blog
appreciate a more one on one interaction will the author.
This is not very possible on very popular blogs with
hundreds of comments. The author of the blog may not always get the time to
reply individually to all the comments from their readers.
Therefore, why not get yourself a contact us page on your
blog. Readers can leave suggestion and pose questions to you directly to your
mailbox. You can then reply to them directly and this will keep them coming
back to your blog. Isn’t that a good thing?
Let’s get started…how did I do it?
Well, I have to admit I have a bit of coding skills in HTML,
CSS, Javascript and PHP but you do not have to worry about this stuff.
The first thing you will need to do is to access, your
blogger account. Make sure you are signed in and in the blogger account for the
blog you want to work on.
Alright then! Next you want to go to you blog layout and
click on the “Add Gadget” link. It will open a pop up window so make sure
pop-ups are not restricted on your browser (This is important).

Click on the “More Gadgets” link and a new page will appear.
Click on the ‘Plus’ sign next to “Contact Form” and then click on save.

The contact page will appear on the sidebar on every page of
your blog. But, I highly doubt that is why you are reading this post. You
probably want a static page with the contact form on it. If that is what you
want, lets head on to the next step.
Creating a Contact Us page for your blog.
Go back into your blogger account and head over to
“Template”.
Click on “Edit HTML” and wait for the text editor to load.
Click inside the text area of the Editor and press CTRL+F to
launch the search bar. Type in ContactForm
then hit enter.
It should find the code below. Click on the arrow to the left of this code.
<b:widget id='ContactForm1' locked='false' title='Contact Form' type='ContactForm'>
Click on the down arrow again on the left of this code
The following code will appear.
<b:includable id='main'>
<b:if cond='data:title != ""'>
<h2 class='title'><data:title/></h2>
</b:if>
<div class='contact-form-widget'>
<div class='form'>
<form name='contact-form'>
<p/>
<data:contactFormNameMsg/>
<br/>
<input class='contact-form-name' expr:id='data:widget.instanceId + "_contact-form-name"' name='name' size='30' type='text' value=''/>
<p/>
<data:contactFormEmailMsg/> <span style='font-weight: bolder;'>*</span>
<br/>
<input class='contact-form-email' expr:id='data:widget.instanceId + "_contact-form-email"' name='email' size='30' type='text' value=''/>
<p/>
<data:contactFormMessageMsg/> <span style='font-weight: bolder;'>*</span>
<br/>
<textarea class='contact-form-email-message' cols='25' expr:id='data:widget.instanceId + "_contact-form-email-message"' name='email-message' rows='5'/>
<p/>
<input class='contact-form-button contact-form-button-submit' expr:id='data:widget.instanceId + "_contact-form-submit"' expr:value='data:contactFormSendMsg' type='button'/>
<p/>
<div style='text-align: center; max-width: 222px; width: 100%'>
<p class='contact-form-error-message' expr:id='data:widget.instanceId + "_contact-form-error-message"'/>
<p class='contact-form-success-message' expr:id='data:widget.instanceId + "_contact-form-success-message"'/>
</div>
</form>
</div>
</div>
<b:include name='quickedit'/>
</b:includable>
Delete everything shown in red above so you will only be left with the following code.
<b:includable id='main'></b:includable>
Done!!
Great!! The hard part is over.
Save the template and head over to Pages and create a new contact us page.
In the page editor, switch to HTML mode and copy and paste the code below.

<style>
.contact-form-widget {
margin-left:auto;
margin-right:auto;
width: 600px;
max-width: 100%;
padding: 0px;
color: #000;
}
.fm_name, .fm_email {
float:left;
padding:5px;
width:48%;
color: #B60000;
}
.fm_message {
padding:5px;
color: #B60000;
}
.contact-form-name, .contact-form-email {
width: 100%;
max-width: 100%;
margin-bottom: 10px;
height:60px;
padding:10px;
font-size:16px;
}
.contact-form-email-message {
width:100%;
max-width: 100%;
height:100px;
margin-bottom:10px;
padding:10px;
font-size:16px;
}
.contact-form-button-submit {
border-color: #C1C1C1;
background: #E3E3E3;
color: #585858;
width: 23%;
max-width: 23%;
margin-bottom: 10px;
height:30px;
font-size:16px;
}
.contact-form-button-submit:hover{
background: #ffffff;
color: #000000;
border: 1px solid #FAFAFA;
}
.introduce-contact-form-now{
border:1px solid #B1B1B1;
width: 600px;
max-width: 100%;
padding: 0px;
margin-left:auto;
margin-right:auto;
padding:8px 8px;
border-radius:8px;
margin-top:20px;
}
</style>
<br />
<div class="introduce-contact-form-now">
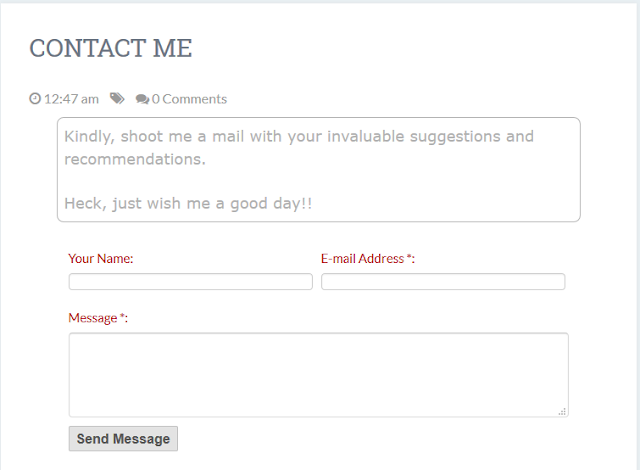
<b><span style="color: #b1b1b1;"><span style="font-family: "verdana" , sans-serif;"><span style="font-size: large;">Kindly, shoot me a mail with your invaluable suggestions and recommendations.</span></span></span></b>
<b><span style="color: #b1b1b1;"><span style="font-family: "verdana" , sans-serif;"><span style="font-size: large;">Heck, just wish me a good day!! </span></span></span></b>
</div>
<div class="widget ContactForm" id="ContactForm1" style="text-align: left;">
<div class="contact-form-widget">
<div class="form">
<form name="contact-form">
<div class="fm_name">
<span class="contact-form-labelinga">Your Name:</span>
<input class="contact-form-name" id="ContactForm1_contact-form-name" name="name" size="30" type="text" value="" /></div>
<div class="fm_email">
<span class="contact-form-labelinga">E-mail Address *:</span>
<input class="contact-form-email" id="ContactForm1_contact-form-email" name="email" size="30" type="text" value="" /></div>
<div style="clear: both;">
</div>
<div class="fm_message">
<span class="contact-form-labelinga">Message *:</span>
<textarea class="contact-form-email-message" cols="25" id="ContactForm1_contact-form-email-message" name="email-message" rows="5"></textarea>
<input class="contact-form-button contact-form-button-submit" id="ContactForm1_contact-form-submit" type="button" value="Send Message" />
<br />
<div class="contact-form-error-message" id="ContactForm1_contact-form-error-message">
</div>
<div class="contact-form-success-message" id="ContactForm1_contact-form-success-message">
</div>
</div>
</form>
</div>
</div>
</div>
Since this uses the Blogger Gadget interface, emails sent through this for will be sent to the email associated with your account. You can easily change the email address in the Admin setting of your blog.
If this post was helpful, don’t forget to share to help others like you.
It should find the code below. Click on the arrow to the left of this code.
<b:widget id='ContactForm1' locked='false' title='Contact Form' type='ContactForm'>
Click on the down arrow again on the left of this code
<b:includable id='main'>
The following code will appear.
<b:includable id='main'>
<b:if cond='data:title != ""'>
<h2 class='title'><data:title/></h2>
</b:if>
<div class='contact-form-widget'>
<div class='form'>
<form name='contact-form'>
<p/>
<data:contactFormNameMsg/>
<br/>
<input class='contact-form-name' expr:id='data:widget.instanceId + "_contact-form-name"' name='name' size='30' type='text' value=''/>
<p/>
<data:contactFormEmailMsg/> <span style='font-weight: bolder;'>*</span>
<br/>
<input class='contact-form-email' expr:id='data:widget.instanceId + "_contact-form-email"' name='email' size='30' type='text' value=''/>
<p/>
<data:contactFormMessageMsg/> <span style='font-weight: bolder;'>*</span>
<br/>
<textarea class='contact-form-email-message' cols='25' expr:id='data:widget.instanceId + "_contact-form-email-message"' name='email-message' rows='5'/>
<p/>
<input class='contact-form-button contact-form-button-submit' expr:id='data:widget.instanceId + "_contact-form-submit"' expr:value='data:contactFormSendMsg' type='button'/>
<p/>
<div style='text-align: center; max-width: 222px; width: 100%'>
<p class='contact-form-error-message' expr:id='data:widget.instanceId + "_contact-form-error-message"'/>
<p class='contact-form-success-message' expr:id='data:widget.instanceId + "_contact-form-success-message"'/>
</div>
</form>
</div>
</div>
<b:include name='quickedit'/>
</b:includable>
Delete everything shown in red above so you will only be left with the following code.
<b:includable id='main'></b:includable>
Done!!
Great!! The hard part is over.
Save the template and head over to Pages and create a new contact us page.
In the page editor, switch to HTML mode and copy and paste the code below.

<style>
.contact-form-widget {
margin-left:auto;
margin-right:auto;
width: 600px;
max-width: 100%;
padding: 0px;
color: #000;
}
.fm_name, .fm_email {
float:left;
padding:5px;
width:48%;
color: #B60000;
}
.fm_message {
padding:5px;
color: #B60000;
}
.contact-form-name, .contact-form-email {
width: 100%;
max-width: 100%;
margin-bottom: 10px;
height:60px;
padding:10px;
font-size:16px;
}
.contact-form-email-message {
width:100%;
max-width: 100%;
height:100px;
margin-bottom:10px;
padding:10px;
font-size:16px;
}
.contact-form-button-submit {
border-color: #C1C1C1;
background: #E3E3E3;
color: #585858;
width: 23%;
max-width: 23%;
margin-bottom: 10px;
height:30px;
font-size:16px;
}
.contact-form-button-submit:hover{
background: #ffffff;
color: #000000;
border: 1px solid #FAFAFA;
}
.introduce-contact-form-now{
border:1px solid #B1B1B1;
width: 600px;
max-width: 100%;
padding: 0px;
margin-left:auto;
margin-right:auto;
padding:8px 8px;
border-radius:8px;
margin-top:20px;
}
</style>
<br />
<div class="introduce-contact-form-now">
<b><span style="color: #b1b1b1;"><span style="font-family: "verdana" , sans-serif;"><span style="font-size: large;">Kindly, shoot me a mail with your invaluable suggestions and recommendations.</span></span></span></b>
<b><span style="color: #b1b1b1;"><span style="font-family: "verdana" , sans-serif;"><span style="font-size: large;">Heck, just wish me a good day!! </span></span></span></b>
</div>
<div class="widget ContactForm" id="ContactForm1" style="text-align: left;">
<div class="contact-form-widget">
<div class="form">
<form name="contact-form">
<div class="fm_name">
<span class="contact-form-labelinga">Your Name:</span>
<input class="contact-form-name" id="ContactForm1_contact-form-name" name="name" size="30" type="text" value="" /></div>
<div class="fm_email">
<span class="contact-form-labelinga">E-mail Address *:</span>
<input class="contact-form-email" id="ContactForm1_contact-form-email" name="email" size="30" type="text" value="" /></div>
<div style="clear: both;">
</div>
<div class="fm_message">
<span class="contact-form-labelinga">Message *:</span>
<textarea class="contact-form-email-message" cols="25" id="ContactForm1_contact-form-email-message" name="email-message" rows="5"></textarea>
<input class="contact-form-button contact-form-button-submit" id="ContactForm1_contact-form-submit" type="button" value="Send Message" />
<br />
<div class="contact-form-error-message" id="ContactForm1_contact-form-error-message">
</div>
<div class="contact-form-success-message" id="ContactForm1_contact-form-success-message">
</div>
</div>
</form>
</div>
</div>
</div>
Since this uses the Blogger Gadget interface, emails sent through this for will be sent to the email associated with your account. You can easily change the email address in the Admin setting of your blog.
If this post was helpful, don’t forget to share to help others like you.